Target changes at major matches need to be efficient and ensure that the target presentation is consistent over the entire match. Adding a new target over a base target is easy for a single target, but can be tricky for target arrays if they are not set up properly from the beginning.
The key things to watch for when building arrays:
1.) Have some method to how the overlapping targets line up. Is it edge to perf, perf to perf, corner to corner, or some other touch points that can be reproduced if the array is destroyed by the wind.
2.) Staple the base target up first and then staple the overlapping target/no shoot directly to the stick with most of the staples that will hold the target, and use only a few staples in the areas where they will have to be pulled to change the target.
3.) Make sure to tack the overlapping target edges to the rear targets to prevent gaps or target curl. Just put a staple through both targets and spread the staple teeth apart on the back side of the target.
4.) Witness mark the target placement on the sticks and take pictures with your cell phone for future reference. And never remove the base target!
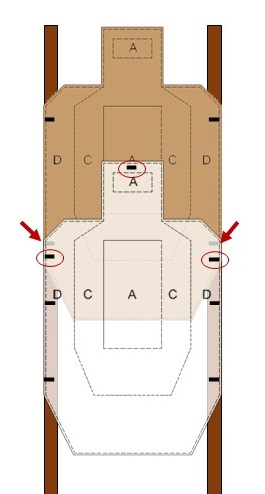
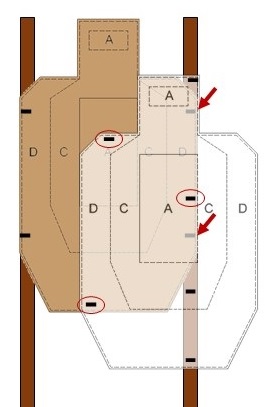
Okay, some items on that list will benefit with some visual aids, so let’s look at a couple different target arrays. The no shoot target is transparent to help illustrate some of the pointers I mentioned above. Staples are represented by the small black rectangles.

The first example is a target array we often see. Scoring target with an overlapping no shoot. The top of the no shoot head is at the cross bar of the letter A and the non-scoring border perforations of the no shoot align with the A-zone perforations. Just be aware that not all target manufacturers place the letter A in the same location on the target so using the letter A for alignment might be an issue if the targets for the whole match are not from the same manufacturer. The red arrows are pointing to staples that were placed on the behind target before the no-shoot was added. The staples that are circled indicate ones that will be pulled during the target change. And pro-tip, investing in a staple puller saves your knife tips and pulling the old staples out versus just leaving them in the stick makes it easier to staple the new targets on. You will notice that a majority of the staples in the no shoot are directly into the stick and not also through the scoring target. This keeps the no shoot firmly in place.

In the second example, the no shoot edge (not perf) is aligned to the lower A-zone perf, the left corner of the no shoot head touches the perf on the scoring target head, and the top of the no shoot is even with the top of the shoulder on the scoring target. The arrows indicate the staples in the scoring target behind the no shoot. You will also see that the no shoot is directly stapled to the stick in the upper right corner and the lower part of the target. There are two staples tacking the overlapping edge of the no shoot down onto the scoring target and they are circled indicating those two staples and one additional one will need pulled in order to replace the scoring target behind the no shoot.
When hanging target arrays for you next match, keep these things in mind. When working a stage at a major match, always check how the arrays are built before the match starts and make adjustments as needed (with RM approval of course). Starting with properly built arrays will save time and headaches later in the match.