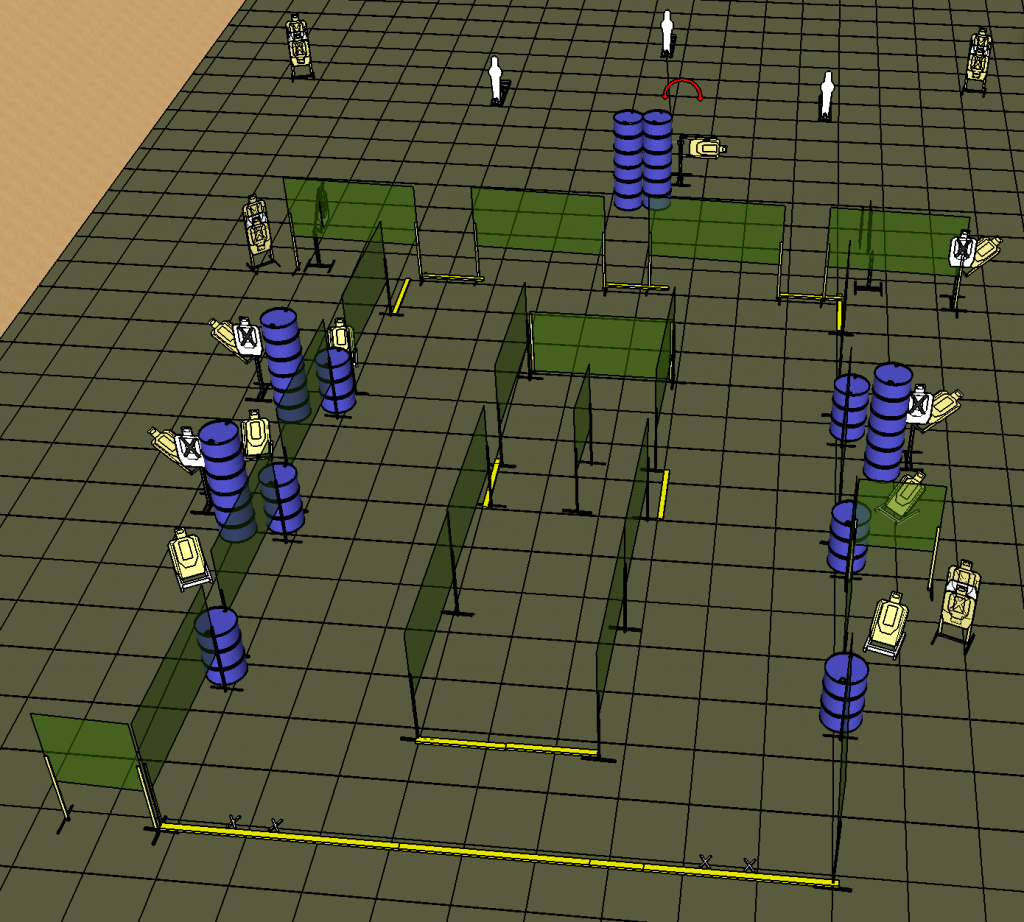
Let’s Get back to our discussion of Retrograde stage design. In this installment, we will examine a typical U-Turn type stage. There are myriad ways to design these types of stages and we are only going to look at a single example here but the concepts we will discuss can be applied to most of these variants.
The stage shown below allows shooters to choose to start on either the left or right side. Yes, it is more than 32 rounds but it is still legal at Level I and Level II matches. A bit of a target diet would make it legal at Level III.

Note the RO safe passage through the center area with a wall that blocks line of sight to targets on the other side but allows the RO to move through. The low front wall and no rear wall, allows the ROs to keep the shooter in view as they move across. Off-limit lines (not shown) and the WSB restrict shooters from moving through this passage.
Also note that there are multiple locations the shooter needs to engage targets from as they move across the down range barrier. The nature of the shots will slow the shooters enough to allow the RO to stay with them and stay out of the way. Again, right handed shooters will likely start on the left and left-handed shooters will start on the right. However, because the number of shots is not balanced side to side don’t be surprised if some shooters in some divisions choose to go against the trend because of how they might want to plan their reloads.
There are multiple ways to handle this type of stage and the right decision, in part, depends on how how the stage is staffed.
If you have enough staff, you can start the shooter and the timer RO then moves across the rear fault line and part way down the opposite side prepared to meet the shooter and move with them to their last position to pick up the last shot while another RO moves down with the shooter on the side they started on. Once the shooter begins to transition across that RO retreats to the rear fault line. This method can be very useful if the transition across is rapid, there is not an RO safe passage, and the RO might not be able to stay with the shooter as they move across and get far enough up range to stay out of their way. The Assistant RO generally will hang back and observe the shooter movement and target engagement from up range.
Another way to handle this, and since we have a slower transition across down range with lots for the shooter to do, is to have the ROs transition through the safe passage. The Assistant RO will retreat further after moving through the safe passage than the Timer RO. The Timer RO will move through the passage and prepare to pick up the shooter and move back with them as they complete the stage. Getting the Assistant RO further back up range keeps them out of the way.
Those are just a couple of the ways to RO this type of stage. There are likely others that will present themselves given your specific stage design. The key points to keep in mind here are: a) It always takes at least two ROs to run a shooter, b) the ROs do not have to stay right on top of the shooter but they can run them from a short distance away controlling them with their voice if necessary, c) an RO safe passage can help the ROs transition without danger of fouling the shooter or getting the ROs down range of the shooter.
Study this stage and any others you find and think about how you would run them, as a shooter then think about how you would run shooters through them, as an RO working either position, timer or assistant. Also consider when it might be best to have three ROs working together to run the shooter. These situations do exist, especially when we enter the world of MultiGun stages.
In our final installment we will look at a simple retrograde “shoot house” type stage.